
A freshly sanded cabinet door can look perfect on the workbench, but the real result appears when the lacquer begins to form the visible coat. That is when loaded edges, dry texture, uneven gloss, or marks from a gun that does not atomize cleanly become obvious. For that reason, a spray gun for lacquer should be chosen as a finishing tool, not as a secondary accessory.
At AV Spray Guns, we see this need often with furniture shops, restorers, refinishers, and professionals who want to sell finer finishes without depending on constant corrections. Lacquer can create smooth surfaces, thin coats, and a professional look, but it requires a tool capable of delivering material with real control.
When application is done with a properly chosen spray gun for lacquer, the work becomes more predictable. The painter can hold a stable distance, adjust the fan to the piece, and build coats without flooding corners or edges. That control is especially valuable on cabinets, doors, panels, tables, trim, and pieces that must look clean both up close and under direct light.
Fine lacquer needs control before gloss appears
Lacquer often dries quickly and leaves little room for correction while the product is still open. If the droplet is too large, texture appears; if it arrives too dry, the finish feels rough; if material builds up on the edges, gloss changes and the piece loses uniformity. That is why the result depends as much on preparation as on the gun being used.

A spray gun for lacquer should help create a fine mist, maintain a full pattern, and allow smooth fluid adjustments. It is not enough for the gun to spray lacquer; it must do it with stability throughout the pass. That difference becomes clear on broad surfaces, where any change in distance, pressure, or speed can create a visible stripe.
In finishes made for sale, the goal is not to cover fast and repair later. The goal is to apply better, sand less, repeat fewer coats, and deliver a surface that reflects professional care. When the gun responds predictably, the painter can focus on the piece instead of compensating for equipment problems.
What a lacquer gun must solve in the workshop?
The first problem a finishing tool must solve is texture. Lacquer may look glossy at first and reveal irregularities as it dries, especially when the surface has side lighting or strong reflections. A properly adjusted gun reduces that risk because it distributes material in finer droplets and helps keep the film even.
In a spray gun for lacquer, the pattern should open cleanly, without side cuts or an overloaded center. That fan shape is essential for overlapping passes without creating stripes. If the fan is distorted, the painter ends up correcting by hand what the gun fails to deliver, and that effort usually creates more variation on the surface.
The second need is edge control. On doors, cabinet fronts, and panels, edges often receive extra material because the hand changes speed at the beginning or end of the pass. A stable gun makes it easier to enter and exit with less excess, as long as the painter opens fluid after starting movement and closes before finishing the pass.
The Avalon A60 HTE 1.3 mm for high-grade lacquer
For applying lacquer with a clean, uniform, ready-to-deliver finish, our main recommendation is the Avalon A60 eXtreme HTE 1.3 mm. In a spray gun for lacquer, this model offers the balance we look for when the work requires thin coats, delicate atomization, and control over full surfaces. Within our current stock, it is our main gun for this field.
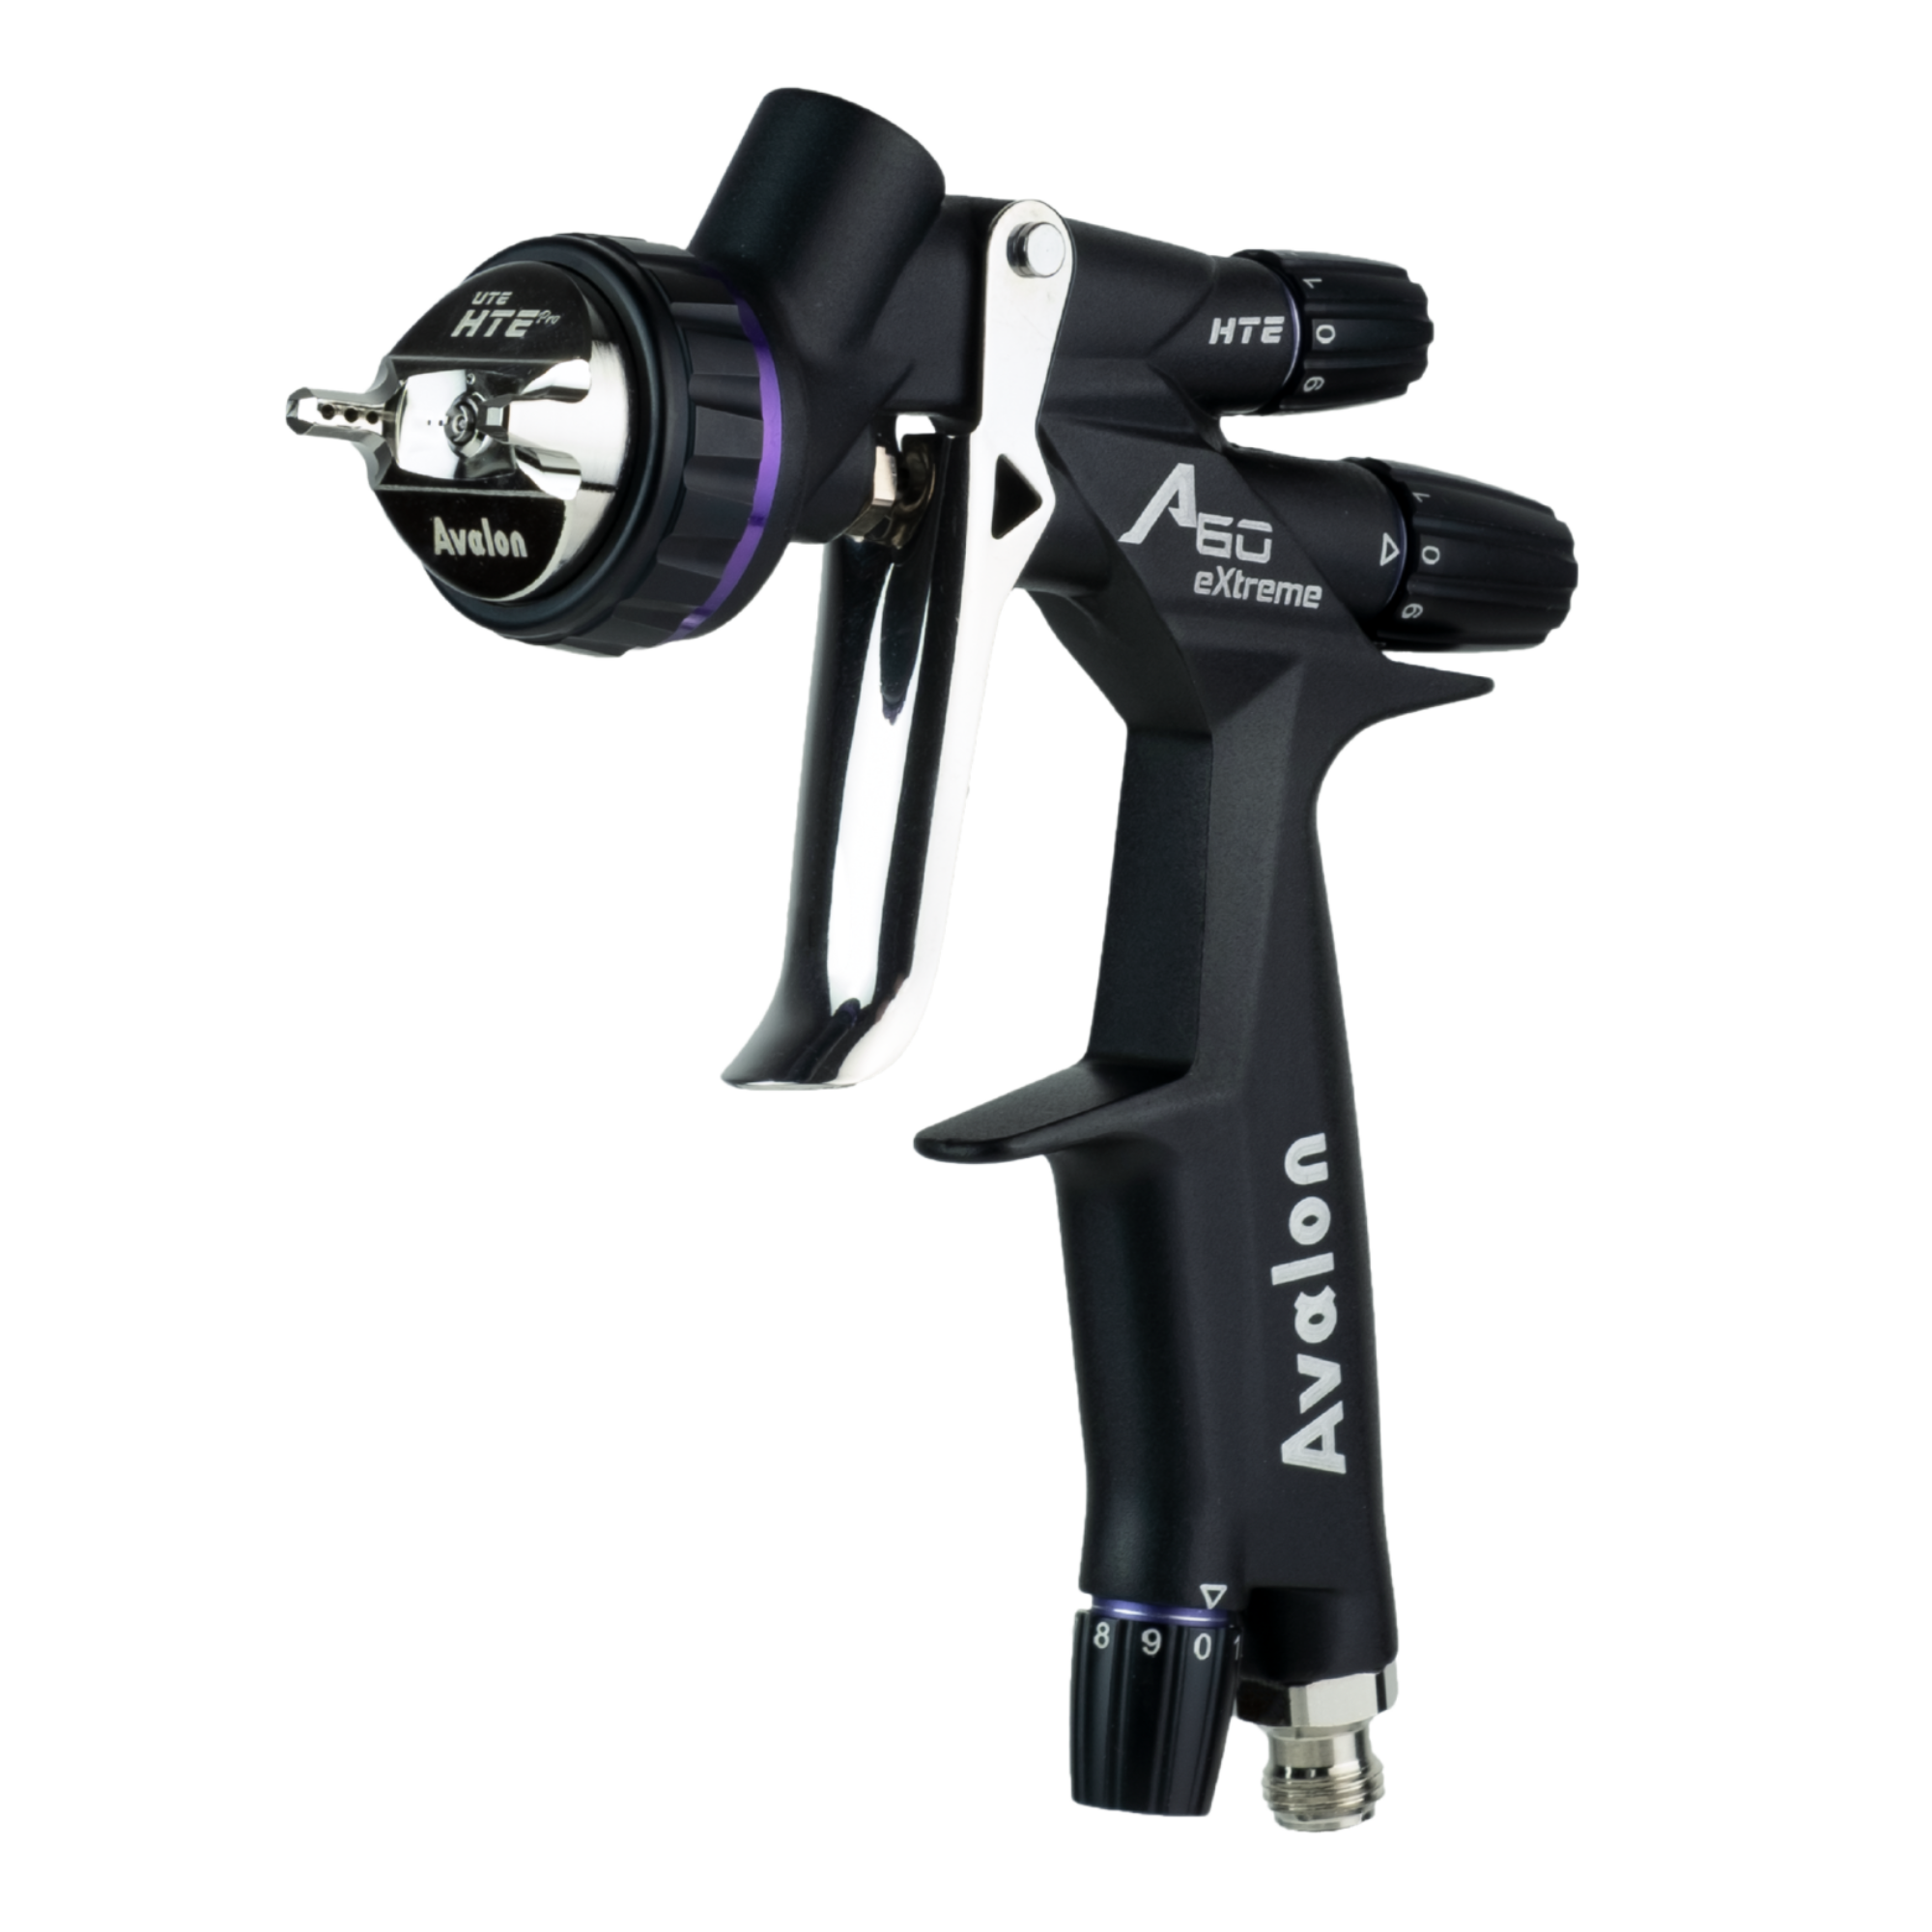
Avalon A60 eXtreme HTE 1.3 mm with U-Split Tip
The Avalon A60 eXtreme HTE 1.3 mm combines a tip size that works well for fine finishes, an HTE system designed for efficient transfer, and a U-Split Tip built to break down material more cleanly before forming the fan. This combination helps reduce bounce back, improve coat smoothness, and maintain more even delivery.
This gun is the right choice when the main work includes furniture, doors, cabinets, panels, fronts, wide decorative pieces, or surfaces where a mini gun would fall short. The A-30 Mini can complement detail work, narrow moldings, and spot touch-ups, but it does not replace the A60 as the main tool when productivity, controlled coverage, and fine finishing on complete pieces are the priority.
- We recommend it for lacquer because it supports a fine coat without overloading the surface.
- The 1.3 mm tip helps work with lacquers, clears, and well-prepared finishing materials.
- The HTE system improves product use and reduces excess spray around the piece.
- The U-Split Tip supports cleaner atomization and a more uniform fan.
- The A60 format allows better progress on larger pieces than a mini spray gun.
- The A-30 Mini remains the support tool for touch-ups, edges, narrow areas, and localized detail.
Ready to spray lacquer with more control?
Choose here the Avalon A60 eXtreme HTE 1.3 mm as your main lacquer spray gun for cabinets, doors, panels, tables, and professional fine finishes, money back warranty until 30 days!
Prepare the product before filling a clean cup
Before spraying, the material must be mixed according to the product instructions and filtered carefully. Lacquer may contain particles, dry skin, or residue that alters the output at the nozzle. When those residues enter the air cap, the pattern changes and the painter starts losing control without understanding why the surface behaves differently.
A spray gun for lacquer cannot correct poorly prepared product. If viscosity is outside the right range, the coat may arrive with coarse droplets or dry before it levels. The best approach is to adjust the material with the compatible reducer, test the mixture on a similar piece, and confirm that the surface receives a wet, fine film without excess on the edges.
The cup also matters. Filling it without cleaning the thread, closing it with residue, or leaving product drying around the lid can contaminate the session. With fast-drying lacquers, small particles are enough to create spitting. That is why we treat preparation as part of the finish, not as a separate task.
Air and fan adjustments to prevent dry texture
Air should be checked with the trigger open, because a static reading does not represent real behavior during spraying. If supply drops during application, atomization becomes irregular. If pressure is excessive, part of the material can dry before reaching the piece and arrive with a rough texture that does not help fine finishing.
When using a spray gun for lacquer, the fan should be adjusted to the piece rather than opened fully by habit. A full door can accept a wider pattern; a molding or edge needs a narrower one. The painter gains control by matching the fan to the area, keeping the gun parallel, and avoiding wrist tilt at the end of the pass.
Distance must remain consistent. Moving closer to create more gloss can cause runs; moving farther away to avoid excess can leave a dry coat. The working point is confirmed with a test on scrap material, watching whether the lacquer lands wet, even, and without buildup at the ends. That test protects the final piece.

Thin coats help create finishes ready for sale
Lacquer usually looks better when it is built with thin, controlled coats. An application that is too heavy can trap solvent, mark corners, or create gloss differences. Several light passes help create depth and a smooth feel with less risk, as long as product timing is respected and the surface is checked between applications.
With a spray gun for lacquer, the intention should be to create a uniform film, not flood the wood or panel. Proper technique begins movement before opening material, maintains steady overlap, and closes fluid before ending the pass. This sequence reduces start marks, heavy edges, and overloaded areas that later require extra sanding.
For work that will be sold, repeating the result matters as much as making one beautiful piece. A set of kitchen fronts, for example, must keep the same gloss level and feel across the full order. Recording tip size, pressure, mix, approximate distance, and waiting time between coats helps repeat the finish on future jobs without relying only on memory.
Mistakes that appear when equipment falls short
The most common mistake is trying to correct everything by hand. When the gun has a poor pattern, the painter often moves closer, moves farther away, slows down, or opens more material during application. That improvisation creates uneven coats. Before touching the final piece, it is better to test the fan and confirm that distribution is stable across the full width.
A professional-level spray gun for lacquer helps prevent that frustration because it responds better to small adjustments. The painter can close fluid slightly, reduce fan width, or adjust pressure without the gun becoming unpredictable. This sensitivity is useful with lacquer, where the finish can change quickly if one pass is too dry or too loaded.
Another frequent mistake is using a mini gun for everything. A compact gun is excellent for tight zones, but it can force too many passes on broad surfaces. That creates visible overlaps, fatigue, and rhythm changes. That is why we recommend the Avalon A60 eXtreme HTE 1.3 mm as the main base and the A-30 Mini as a complement for localized work.
Practical guide for choosing a lacquer setup
The following guide helps organize the choice according to the type of piece and the finishing goal. It works as an initial reference for deciding when to use the Avalon A60 eXtreme HTE 1.3 mm as the main gun and when to consider an A-30 Mini as support. A test with the actual product is still necessary before spraying the final piece.
| Type of work | Recommended gun | Main advantage | Best use |
|---|---|---|---|
| Doors and wide panels | Avalon A60 eXtreme HTE 1.3 mm | Stable fan and fine coat | Main lacquer application |
| Cabinets and kitchen fronts | Avalon A60 eXtreme HTE 1.3 mm | Even coverage on visible surfaces | Ready-to-deliver finishes |
| Moldings and narrow edges | A-30 Mini as a complement | Better control in small areas | Touch-ups and details |
| Tables and flat tops | Avalon A60 eXtreme HTE 1.3 mm | Better rhythm on larger areas | Uniform coats by sections |
| Spot repairs | A-30 Mini as a complement | Less overspray around the area | Localized corrections |
For most lacquer work on complete pieces, a spray gun for lacquer must offer more than spot precision. It needs rhythm, controlled coverage, and fine atomization through full sessions. That is why the A60 HTE 1.3 mm is our main answer when a customer wants a fine-finishing tool capable of supporting professional-quality results.
5 practical adjustments for smoother lacquer work
These adjustments help get better performance from the gun before applying material to a valuable piece. They do not replace the product technical sheet, but they organize application and reduce common defects. The proper spray gun technique follows the same principle: control air, fluid, distance, and pass movement before trusting the final gloss.
- Confirm pressure with the trigger open and the gun in working position.
- Adjust the fan to the real width of the piece, not to the maximum available.
- Filter the lacquer before filling the cup and check for dry residue.
- Test the pattern on scrap with a real pass, not only with a fixed spray burst.
- Keep overlaps steady so each coat covers without creating visible stripes.
When these habits are paired with the right spray gun for lacquer, application becomes more stable. The painter stops chasing gloss with excess product and starts building a cleaner film. On furniture, cabinets, and decorative pieces, that difference reduces corrections and improves the final appearance for the customer.
Cleaning the gun after spraying fine lacquer
Post-application cleaning defines how the gun will perform in the next session. Lacquer dries quickly and can leave deposits on the tip, needle, and air cap. If that residue stays there, the next job begins with a crooked pattern or spitting that does not come from the new material, but from old buildup.
After using a spray gun for lacquer, cleaning should be done with compatible products and without damaging internal parts. We do not recommend scraping tips with hard objects or forcing threads. Proper cleaning protects the U-Split Tip, preserves trigger response, and keeps the fan shape needed for delicate finishes.
It is also useful to check seals, cup, air filter, and regulator before storing the equipment. A small problem in the air supply can ruin a perfect coat. In our catalog, we keep parts and accessories that help keep the gun ready for professional use, because a serious finishing tool should be maintained with the right components.
Safety and workshop conditions during lacquer work
Lacquer may require ventilation, respiratory protection, and strict control of the work area, depending on its formulation. The product technical sheet should always be followed, especially with solvent-based materials. A professional gun improves application, but it does not replace an organized space, suitable extraction, or personal protection designed for the product being used.
When working with a spray gun for lacquer, the environment strongly affects the finish. Dust, humidity, grease, silicone, or contaminated air can mark the surface. Keeping the piece clean, preparing the area, and avoiding dirty airflow during drying helps the lacquer level more cleanly. A technical article on sprayed lacquer finishing also highlights the value of light coats and proper waiting time.
Lighting deserves special attention. Lacquer can appear even from the front and show stripes under side light. Positioning the piece so the reflection can be read during the pass helps detect dry or overloaded zones before the defect spreads. In fine finishing, seeing the wet edge clearly is part of control.
Compatibility tests before applying fine lacquer
Not every lacquer behaves the same over sealers, stains, primers, or previously finished surfaces. Before working on a customer piece, it is smart to test the full system on similar scrap. That test shows whether wrinkling, adhesion problems, blushing, gloss change, or reaction between coats may appear before the main piece is at risk.
For this step, a spray gun for lacquer makes the result more reliable because it allows the real application to be reproduced: same distance, same fan, same fluid setting, and a coat similar to the one the final surface will receive. The test should not be just a quick burst on cardboard; it should imitate the work that will be done on the furniture, panel, or cabinet.
AV Spray Guns supports fine finishes with Avalon tools
At AV Paint Spray Guns, we work with authentic Avalon spray guns for users who want real control in professional finishes. Our recommendation for lacquer work is clear: the Avalon A60 eXtreme HTE 1.3 mm is the most suitable base in our stock when the goal is thin coats, good gloss, stable atomization, and surfaces ready to sell. We also know when an A-30 Mini adds value, especially for details, touch-ups, and narrow areas.
- We recommend the A60 HTE 1.3 mm as the main gun for lacquer on complete pieces.
- We suggest the A-30 Mini as a complement when the job requires localized precision.
- We offer parts and accessories to keep equipment in professional condition.
- We support the choice according to piece type, material, expected finish, and work rhythm.
We want every customer to buy the tool that truly fits the way they work. The first choice for a professional spray gun becomes easier when each Avalon family is understood by its real function: A60 for main jobs with greater coverage and A-30 Mini for compact control. With that base, a spray gun for lacquer stops being a technical doubt and becomes a direct ally for creating fine, repeatable, commercial-quality finishes.